
I have always loved enamel pins. People admire them, but they fear the production cost. I know this problem well. It used to overwhelm me. Then I found a method. Now I want to share how I solved it with you.
Making your own enamel pins at home involves simple etching steps, basic tools, and a bit of practice. You can prepare brass sheets, apply a resist for your design, etch the metal, paint your designs, and bake them for strong enamel results.
I remember the first time I considered making pins by myself. My curiosity pushed me to learn the most basic home-based methods. I want you to feel the same spark I did, so let’s start this journey together.
Prepare Your Metal
I like to begin every project by choosing and cutting my metal sheets. This step is essential. It sets the foundation for the entire pin-making process. I usually go for brass sheets because they are sturdy and have a nice finish.
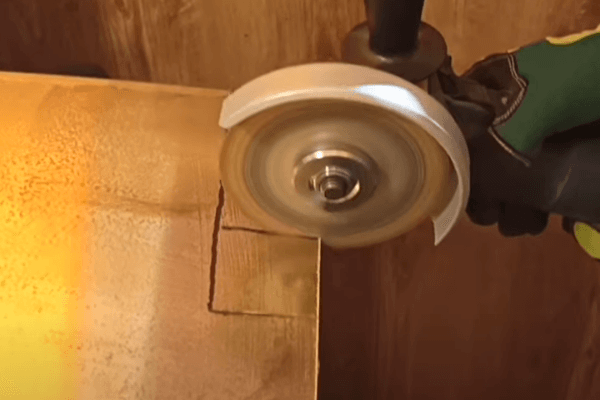
I cut a piece of brass (often 1.5mm thick) using a hacksaw. Then I sand and polish the surface to get it smooth. This might involve using 300-grit sandpaper or an all-in-one grinder and polisher. I make sure the surface is free of grime or grease, which can interfere with resist adhesion. This initial sanding step ensures my pin’s surface is set for crisp etching lines and better enamel coverage later. I have tried skipping this before, but it led to poor results.
Tools, Costs, and Personal Trials
I want to elaborate on the cutting and surface prep steps because I learned the hard way about the importance of cleanliness:
My Cutting Tools Breakdown
| Artikel | Zweck | Estimated Cost |
|---|---|---|
| Hacksaw | Basic cutting of brass sheets | $9.99 |
| All-in-one grinder/polisher | Smooth edges, polish surfaces | $78.21 |
| 300-grit sandpaper | Fine sanding for a flat surface | $5 (per pack) |
When I first started, I tried normal scissors on thin brass. That was a disaster. The edges were jagged, and my hands cramped. So I recommend a hacksaw or a jeweler’s saw. If I want speed, I use the grinder. If I want precise lines, I rely on the saw. I have learned that if the metal is not well-prepped, the design will come off during etching. Cleanliness matters because the resist sticks poorly on dusty or greasy surfaces.
I usually wipe my piece with isopropyl alcohol before I proceed. Sometimes I even use acetone if I see leftover coatings. If I skip proper cleaning, I risk random blotches that ruin the design. That is how crucial Step 1 is.
Apply and Set the Resist
I get excited about this step. This is where I place my design on the metal. I use either Transfer Paper (for soft enamel) or Vinyl (for hard enamel). This is how I define which areas will be etched.
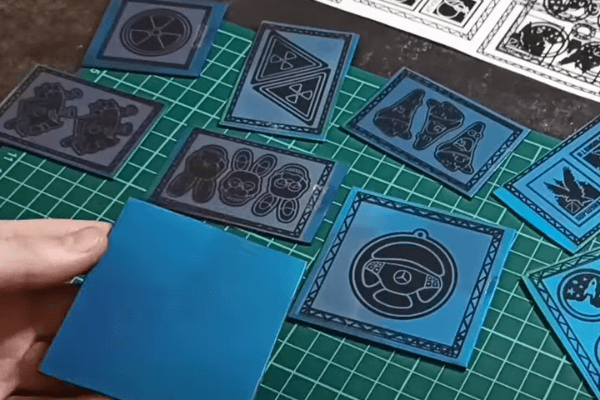
I apply my design by printing it onto PCB transfer paper or vinyl. For transfer paper, I cure it under UV light, wash off the toner, and ensure the metal’s exposed sections are ready for etching. For vinyl, I might use a Cricut Maker 3 to cut the design. Then I attach it and use heat to secure it. My biggest takeaway here is to ensure the design is crisp, so the lines are sharp after the etch.
Soft Enamel vs. Hard Enamel Resist Methods
Soft Enamel Resist with PCB Paper
Ich habe PCB-Farbe oder Transferpapier verwendet, wenn ich einen einfacheren Ansatz wollte. Ich drucke mein Design mit einem Laserdrucker. Dann trage ich es auf die Metalloberfläche auf. Ich habe es zwei Minuten lang unter eine kleine UV-Lampe gestellt. Danach wasche ich es in Seifenwasser. Dies hilft dabei, den Toner in Bereichen zu entfernen, die nicht vom Resist bedeckt sind.
| Schritte für Soft-Email-Resist | Anmerkungen |
|---|---|
| Drucken Sie auf Transferpapier | Laserdrucker funktionieren am besten |
| Unter UV-Licht belichten | Etwa 2 Minuten |
| Seifenbad | 1 Esslöffel Seife pro Tasse Wasser |
| Salzwasserwäsche | 1 Esslöffel Salz pro Tasse Wasser |
During my first attempt, I left the paper under the UV for too long. The design got overexposed. I learned to time it precisely. Also, the saltwater bath is great for people who want a simpler electrochemical etch at home. I connect copper wiring to the back, adjust the current, and watch the exposed metal dissolve.
Hard Enamel Resist with Vinyl
Wenn ich harte Emaille-Pins anstrebe, verwende ich Vinyl. Ich drucke das Design mit einem Cricut Maker 3 oder einem beliebigen Vinylschneider aus. Ich wende Hitze an, normalerweise mit einer kleinen Heißluftpresse oder sogar einem Fön, damit das Vinyl gut haftet. Dann bereite ich mein Säurebad vor. Dieser Schritt dauert normalerweise ein paar Stunden, daher plane ich entsprechend. Ich habe einmal ein Design geschmolzen, weil ich eine Säure verwendet habe, die zu stark für das Metall war. Ich habe gelernt, dass unterschiedliche Metalle unterschiedliche Säuren benötigen. Nach dem Einweichen neutralisiere ich es in einem Natronbad.
I add electroplating here too, because the acid bath leaves a deeper cavity, so the plating can settle well. I connect the piece to the plating machine, choose my current level, and wait for the layer to bond. When done carefully, it produces a neat, professional finish.
Etching the Metal
I remember when I first tested etching solutions. It felt like a science experiment in my basement. It still does sometimes. Etching is where the design begins to form its actual shape.

Normalerweise bereite ich Eisenchlorid vor, wenn ich mich für die Press-N-Peel Blue-Methode entscheide. Wenn ich ein Salzwasser- oder Säurebad anstrebe, stelle ich sicher, dass der Resist vollständig versiegelt ist. Ich hänge das Metall kopfüber auf, damit Schmutz herunterfallen kann. Wenn ich alle 30 Minuten nachschaue, kann ich rechtzeitig anhalten, bevor das Design zerfressen wird. Richtig geätzte Designs zeigen klare Linien und eine gleichmäßige Tiefe. Wenn ich überstürze oder Schritte überspringe, kann das Ergebnis ungleichmäßig sein oder ganz durchbrechen.
My Experiences with Different Etching Solutions
Ferric Chloride vs. Saltwater
Ferric chloride is my go-to for brass or copper. It is a strong solution that cuts through metal quickly. However, it is also a bit messy and stains everything. I wear gloves and protective clothing. When I want a less toxic approach, I use saltwater with an electroplating machine. That does the job, but it can be slower.
| Etching Solution | Profis | Nachteile |
|---|---|---|
| Ferric Chloride | Fast and effective | Can stain surfaces, strong fumes |
| Saltwater + Electro | Less toxic, more accessible | Slower, requires stable power source |
I learned that temperature and agitation can speed up the etch. Sometimes I gently rock the container to dislodge bubbles. If I see my design starting to fade in crucial areas, I rinse everything, let it dry, and reapply resist if needed. That is tedious, but it saves me from redoing everything from scratch.
Time and Depth Control
When I plan soft enamel pins, I only want a moderate depth so I can fill them with paint. That usually takes 30–45 minutes in ferric chloride for brass. For a deeper cavity (like for hard enamel or deeper plating), I might go two hours or more. I keep a small sample piece to test. If it over-etches, I will know to reduce the time.
Cutting Out the Shape
Dieser Schritt bestimmt den endgültigen Pin-Umriss. Ich genieße diesen Teil, weil ich endlich sehe, wie mein Design Gestalt annimmt. Ich verwende eine Juweliersäge oder manchmal auch einfach meine Bügelsäge, wenn die Form einfach ist.
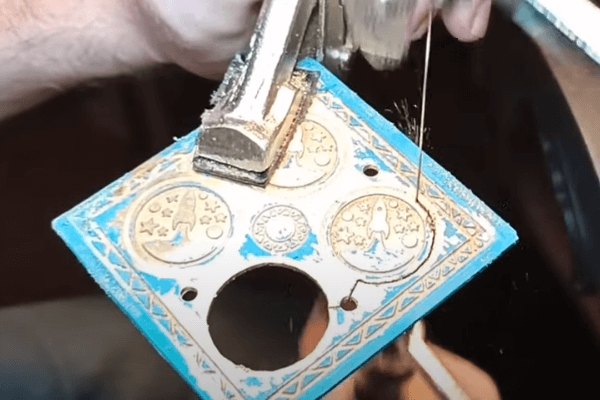
Ich folge meinen geätzten Linien und entferne vorsichtig überschüssiges Metall. Anschließend feile und schleife ich die Kanten, damit sie sicher verarbeitet werden können. Ich möchte nicht, dass scharfe Ecken die Leute stoßen, die meine Anstecknadeln tragen. Dieser Endbearbeitungsschritt kann mit kleinen Werkzeugen zu Hause durchgeführt werden. Ich habe ein Standardset bei mir.
My Personal Cutting Tips
Ich habe mich einmal an komplizierten Formen versucht und dabei mehrere Sägeblätter zerbrochen. Jetzt zeichne ich einen groben Schnittbereich um die endgültige Form herum. Ich schneide das zuerst aus und lasse etwas Rand übrig. Dann mache ich Detailschnitte. Dieser Ansatz schont die Klinge. Außerdem halte ich das Metall fest fest, damit es beim Schneiden nicht verrutscht.
| Schneidwerkzeuge | Am besten für |
|---|---|
| Juweliersäge | Komplizierte Formen, Kurven |
| Hacksaw | Gerade Linien, stabilere Schnitte |
| Schleifer | Schnelles Glätten von Kanten |
Ich habe auch einen All-in-One-Schleif- und Polierer verwendet, um Kanten zu bearbeiten. Dieser Polierer verursacht zwar zusätzliche Kosten, spart aber Zeit. Ich musste die Kosten von rund 78,21 $ für mein Unternehmen rechtfertigen. Für mich hat es sich gelohnt. Wenn ich neue Formen in Serie herstelle oder teste, brauche ich Effizienz.
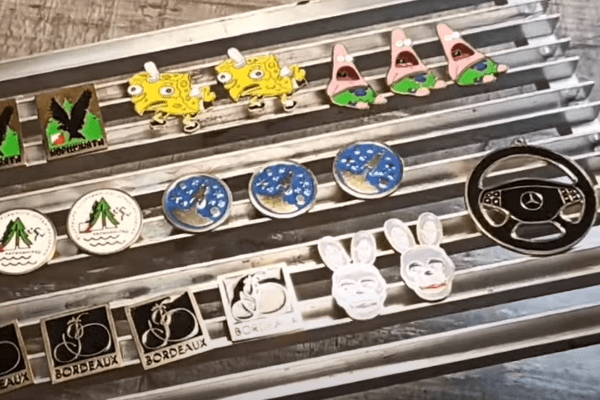
Painting the Enamel
Painting is where the design becomes beautiful and vivid. I have used acrylic paint, enamel paint, and even UV paints. These differ in how they cure and how glossy they appear.
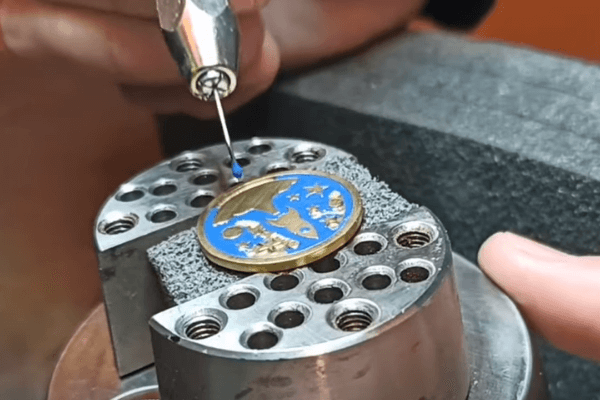
I find that small needle brushes or fine-tipped droppers help me place paint precisely in the etched areas. I mix my colors in tiny palettes. I add a bit of thinner if I want smoother strokes. If I rush this part, I get bubbles or uneven coverage. Being patient and layering the paint helps.
Selecting Paint and Application Techniques
My Paint Selection Strategy
- Acrylic Paint: Dries quickly, but not as durable unless sealed with a topcoat.
- Enamel Paint: More durable, often used for scale models. Takes longer to dry.
- UV Paint: Cures under UV light. Very convenient for smaller spaces.
Ich entscheide basierend auf der Art der Anstecknadel, die ich anfertige. Wenn es sich um weiche Emaille handelt, möchte ich Farbe, die leicht in die geätzten Vertiefungen eindringt und so den klassischen geriffelten Look erzeugt. Bei Hartemaille wünsche ich mir ein gleichmäßigeres Finish. Ich könnte mehrere Schichten auftragen und zwischen den einzelnen Schichten schleifen. Das ist mehr Arbeit, sieht aber professionell aus.
Practical Painting Tips
Ich habe ein paar Zahnstocher dabei, um Blasen herauszustechen. Ich habe immer eine Lupe dabei, um kleine Unvollkommenheiten erkennen zu können. Wenn ich sehe, dass Farbe aus den geätzten Linien kriecht, entferne ich sie mit einem kleinen Pinsel, der in Alkohol oder Verdünner getaucht ist. Diese Liebe zum Detail kann über das Endergebnis entscheiden.
Baking and Curing
Baking the pins is a vital step for enamel durability. This ensures the paint hardens and bonds well with the metal. It also helps keep the finish from chipping.
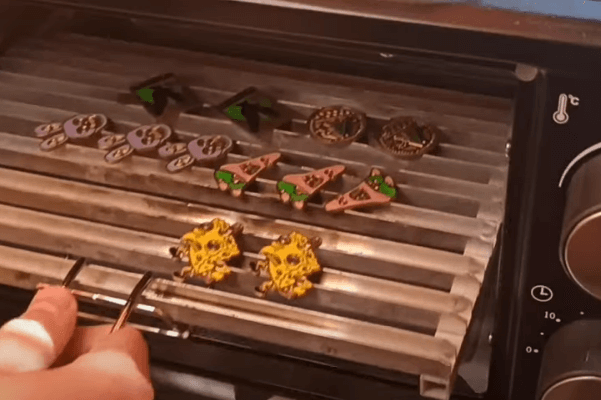
I heat my oven to 300–400°F and place the pins in carefully. I usually leave them there for around two hours, but I also experiment with time and temperature. After that, I let them cool for 24 hours. This waiting period helps the enamel fully set.
My Observations on Baking Times
I once tried to rush the process by heating the oven to 450°F. The paint bubbled and turned weird shades. So I recommend caution. Different paints may have different temperature thresholds. It is a good idea to do a test piece first.
| Temperature (°F) | Baking Duration | Ergebnis |
|---|---|---|
| 300 | ~2 hours | Gradual cure, fewer paint flaws |
| 350–400 | ~2 hours | Balanced cure, normal approach |
| 450 | ~1 hour | Risk of bubbling or color shift |
I learned that if I open the oven door too soon, the rapid temperature drop can also cause cracks in the enamel. So I turn off the heat and let the pins cool slowly. The next day, I do a quick scratch test on an inconspicuous area. If it passes, I move on to polishing.
Polishing and Final Touches
This is my favorite part. I love unveiling the final look of the pin. Polishing removes dust or leftover residue. It also gives the pin a shine that catches the eye.
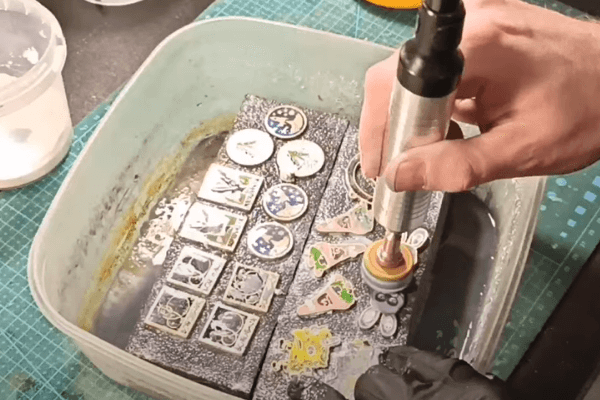
I often go back to my all-in-one polisher. A gentle buffing wheel lifts surface smudges. I also use a microfiber cloth to wipe away any leftover polish. If I see any imperfections in the paint, I fix them with a small brush. Then I store my pins in a dry place to protect them from moisture.
My Steps for a Shiny Finish
Polishing Compounds
- Jeweler’s Rouge: Great for removing minor scratches.
- Metal Polishing Cream: Adds a reflective sheen to brass or copper edges.
- UV Resin Topcoat: Can be layered on top for added protection, but it adds more thickness.
Ich habe gelernt, dass der letzte Schliff Mängel hervorheben kann. Manchmal finde ich winzige Farbflecken auf dem Metall. Es ist eine demütigende Erinnerung daran, dass handgefertigte Gegenstände kleine Macken haben können. Allerdings berücksichtige ich auch diese leichten Unvollkommenheiten als Teil des Charmes. Wenn ich für einen Kunden eine einwandfreie, große Charge möchte, kann ich mich auf meine Fabriklinien verlassen. Aber für ein persönliches oder kleines Projekt mag ich diese subtilen Details.
Optional Mass Production Approach
Ich betreibe INIMAKER in China. Ich verfüge über vier Produktionslinien, die Großaufträge für Firmenkunden abwickeln. Ich verkaufe auch im Großhandel an viele große Abnehmer in den Vereinigten Staaten, Russland, Frankreich und anderen Ländern. Aber als ich zum ersten Mal mit selbstgemachten Emaille-Pins experimentierte, wurde mir klar, dass die Massenproduktion für die Einrichtung einer einzelnen Person zu Hause möglicherweise nicht praktikabel ist.
In großem Maßstab verlassen sich Fabriken auf Stahlstanzen, die von leistungsstarken CNC-Fräsmaschinen geschnitten werden. Sie stanzen auf einer großen Presse. Sie tragen Emailfarbe mit handelsüblichen Dosiermaschinen auf und backen sie dann in Industrieöfen. Es ist kein DIY-Ansatz. Wenn Sie Tausende von Pins benötigen, denken Sie über eine Fabrik nach. Wenn Sie aber nur eine Handvoll haben möchten, ist diese DIY-Route ideal.
My Perspective as a Factory Owner and Crafter
Understanding the Difference
Wenn ich mit großen B2B-Kunden arbeite, benötigen sie eine gleichbleibende Qualität. Sie benötigen Zertifizierungen, eine robuste Logistik und garantierte Lieferzeiten. Meine typischen Kunden, wie Mark Chen aus Frankreich, betreiben Tourismusunternehmen. Sie wollen malerische Münzen oder Anstecknadeln in großen Mengen. Sie kümmern sich auch um Kosten, Zoll und Versandzeiten.
Wenn Mark seine Produkte aus Entwicklungsländern bezieht, legt er den Schwerpunkt auf Preis und Qualität. Er hasst verspätete Lieferungen. Das ist einer der Gründe, warum wir unsere Prozesse bei INIMAKER verfeinert haben. Wir sorgen für stabile Produktionsabläufe, große Öfen und qualifizierte Arbeitskräfte. Für die Privat- oder Kleinserienproduktion reicht jedoch der Heimansatz aus. Es ermöglicht mir oder jedem Heimwerker, ohne großen Aufwand mit neuen Ideen oder individuellen Designs zu experimentieren.
Testing and Evaluating Your DIY Pins
Ich bewerte meine Pins gerne nach jeder Charge. Ich suche nach Farbblasen, abgeplatztem Zahnschmelz oder untergeätzten Linien. Wenn etwas nicht stimmt, behebe ich es entweder oder notiere den Fehler zur späteren Bezugnahme.
Testing for durability helps me gauge whether my pins can handle everyday wear. I might attach one to a bag or jacket and see if it scratches or chips in normal conditions. I have discovered that a protective clear coat can extend the pin’s life, especially if it faces friction.
Troubleshooting Common Problems
My Quick-Fix Table
| Ausgabe | Ursache | Lösung |
|---|---|---|
| Bubbles in paint | Overheating or poor paint mixing | Lower baking temp, stir paint gently |
| Incomplete etch | Weak solution or short etch time | Extend time, verify solution concentration |
| Resist peeling | Dirty surface or too high heat on transfer | Clean thoroughly, reduce heat application |
| Fading colors | Overexposure to heat or UV curing imbalance | Calibrate times, use recommended specs |
I find it useful to keep a little journal of each experiment. I note the brand of paint, the temperature, and how the pin turned out. Over time, I see patterns. For instance, certain color pigments just do not handle high heat well. Or some metals might react differently to certain enamels.
Sharing or Selling Your Work
I sometimes share my DIY enamel pins as small gifts, or I keep them to test new design ideas that I might later bring into my factory production. If you want to sell them online, you can post them on your personal site or social media. People appreciate handmade items.
I promote these smaller runs on my website (www.inimaker.com) and direct some B2B clients there if they want smaller volumes. They usually ask for bigger volumes, though, so that’s where my factory lines come in. Either way, I love seeing how a simple DIY approach can still yield a pin that people are happy to buy or collect.
My Advice on Marketing DIY Pins
- Storytelling: I share my personal journey with each design. Buyers enjoy the backstory.
- Quality Photos: Good lighting can show the pin’s details.
- YouTube Demonstrations: I embed videos to explain the process. Like I might link a tutorial here: DIY Enamel Pin Tutorial.
Abschluss
Ich habe meinen Herstellungsprozess für Emaille-Pins zu Hause durchlaufen. In kleinen Mengen ist dies problemlos möglich. Die Ergebnisse können ausgezeichnet sein. Sie können diese Schritte ausprobieren, wenn Sie Ihre eigenen Pins ohne Fabrik entwerfen möchten. Ich wünsche dir viel Erfolg bei deinem DIY-Abenteuer!