
I once worried about confusing manufacturing steps, wasted time, and unpredictable costs. I decided to simplify the process. Now I focus on helping you avoid pitfalls. I want you to feel confident about how enamel pins are crafted.
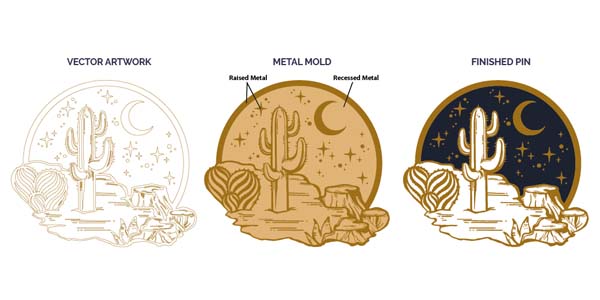
Enamel pins are created by turning a digital design into a metal mold, stamping the design into a base, adding plating, and finally filling it with enamel color. Each step ensures smooth surfaces, bright colors, and accurate details for collectors and businesses.
I remember a large buyer from France who almost gave up because of production delays. I shared the step-by-step approach. He stayed intrigued and discovered how these pins get their vibrant details.
Fabricación de moldes
Empiezo convirtiendo un archivo digital en un molde físico. Esto transforma mis ideas de diseño en realidad. Este molde se convierte en la base para el resto de pasos de producción.
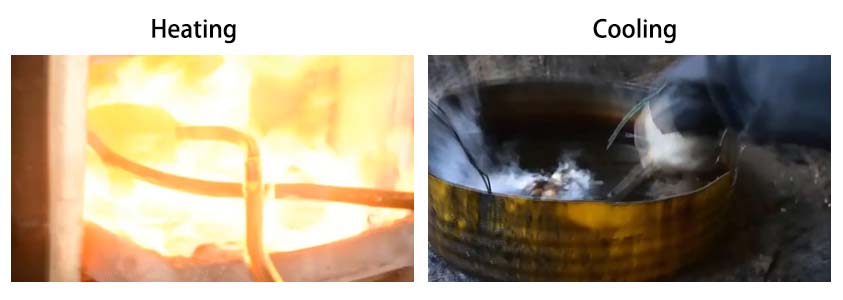
Subo mi diseño finalizado a una máquina especializada que lo talla en acero. Luego quito el metal sobrante para darle forma al molde. El calentamiento y enfriamiento repetidos endurecen el molde para que pueda soportar el estampado a alta presión. Este paso crea una base precisa y duradera.
Dive Deeper into Mold Creation
Aprendí la importancia de los moldes fuertes después de que un lote anterior se rompiera bajo tensión. Ese percance me obligó a probar nuevas aleaciones de acero. Ahora confío en acero industrial de alta calidad. El tratamiento térmico garantiza que el molde no se agriete cuando se utiliza en metales más blandos como el hierro o la aleación de zinc. A continuación se muestra una breve descripción general:
| Paso | Acción | Por qué es importante |
|---|---|---|
| Archivo digital | Finalizar la ilustración del pin en forma vectorial | Garantiza contornos nítidos |
| Corte CNC | Una máquina talla un diseño en acero | Logra detalles exactos |
| Tratamiento térmico | Ciclos repetidos de calentamiento y enfriamiento. | Increases mold strength |
| Excess Trim | Cut off surplus metal material | Helps mold fit machinery |
I value precision because a flawed mold can ruin hundreds of pins. Maintaining strict quality checks helps me avoid wasted materials and time.
Estampa el patrón y recorta los alfileres.
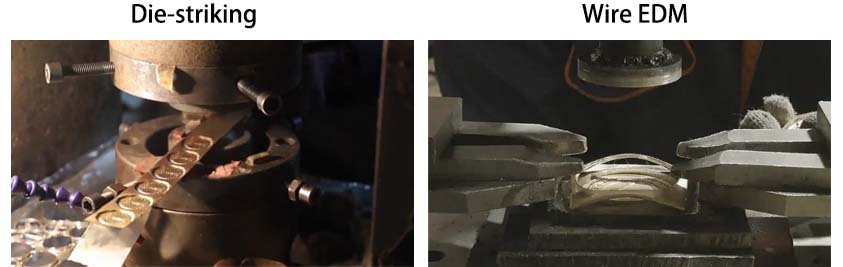
After the mold is ready, I stamp the pin shape into softer metal. This is where the design takes a physical form.
I place the hardened steel mold into a stamping machine. Then I press it with about five tons of force onto an iron or zinc alloy plate. Next, a separate machine punches out the final shape of the pin. This is also when I solder on the pin backing.
Sumérgete más en el estampado
Recuerdo mi primera sesión de estampado con Mark Chen, un confiado comprador francés que quería ver cómo transformamos los diseños en formas 3D. Quedó fascinado por el atronador ruido de la prensa. Este paso requiere una presión constante. Si la máquina se desvía aunque sea una fracción, el diseño se desalinea.
Consideraciones clave:
- Elección de metales: Es común la aleación de hierro o zinc. Son asequibles y lo suficientemente suaves para sellos con mucho detalle.
- Calibración de la máquina: Pruebo los niveles de presión antes de cada ejecución. La calibración precisa evita impresiones dobles y preserva el molde.
- Soldar el respaldo: Coloco el cierre mientras el alfiler aún está caliente. Este enfoque garantiza una unión sólida, lo que reduce el riesgo de rotura.
I sometimes face time constraints if I have large orders from the United States or Europe. Keeping four production lines running helps me stay on schedule, but I still prioritize correct machine setup over speed. I want to avoid final pins with mismatched outlines.
Electrochapado
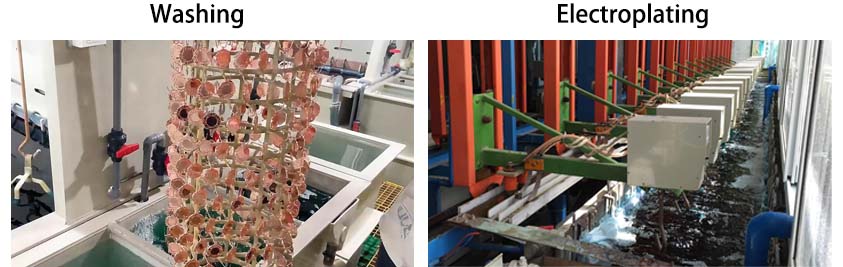
Next, I prepare soft enamel pins for electroplating. This step gives the pins their metallic finish or dyed color. It’s also where the pins begin to look polished.
Soft enamel pins get electroplated first. An electric current passes through a special solution, bonding the chosen metallic finish (like gold or silver) onto the pin. Soft enamel pins can also be color-dyed in any Pantone shade if you prefer non-metallic outlines.
Sumérjase más en la galvanoplastia para obtener un esmalte suave
I was initially baffled by the electroplating science. Now I see it like a magic bath. The positive ions from the plating metal deposit onto the negative pin base. This plating ensures consistent color and adds a protective layer.
Acabados Comunes:
- Oro: Popular for luxury appeal.
- Plata: Classic, reflective look.
- Latón antiguo: Retro effect, suits vintage themes.
- Color Dye: If I need pink outlines or other unusual colors, I rely on dye instead of metallic plating.
I notice that sporting goods companies often prefer traditional gold or silver for awards. Meanwhile, travel companies or museums might ask for more experimental colors. Electroplating is a key stage. If I don’t maintain a clean solution or stable current, the final surface could appear dull or uneven.
Esmaltar y hornear
Aquí es cuando los alfileres reciben su toque de color. Ya sea esmalte suave o duro, el proceso implica aplicar pintura de esmalte con cuidado y hornearla.
Durante el esmalte suave, relleno las áreas rebajadas con pintura fina, dejando los bordes del alfiler elevados. Para el esmalte duro, relleno el color hasta el borde y luego lo horneo. Utilizo una máquina inyectora o lo hago a mano. Posteriormente la pintura endurece en el horno.
Profundice en la aplicación del esmalte
Considero que el esmaltado es el paso más satisfactorio visualmente. He visto delicados diseños de sopa ramen o intrincados zorros de tres ojos que cobran vida cuando se les agrega color. Utilizo herramientas automatizadas o técnicas manuales:
Métodos de aplicación de esmalte (suave o duro)
| Tipo | Estilo de aplicación | Mirada final | Casos de uso típicos |
|---|---|---|---|
| Esmalte suave | Capa fina, empotrada debajo del borde. | Textured, visible metal borders | Complex line art, cost-effective |
| Esmalte duro | Filled to level of metal edges | Flat, glossy, more durable | Premium pins, polished final finish |
At this point, I notice customers like Mark Chen often choose soft enamel for tourist commemorative coins because it’s cheaper and features more color outline options. Corporate buyers looking for a heavyweight look sometimes pick hard enamel. Keeping track of client needs is essential. If I fill the enamel incorrectly, the final product looks sloppy, and I risk rework.
Polaco
After soft enamel pins are baked, they’re nearly complete. However, hard enamel pins require extra polishing to ensure a perfectly even surface.
Hard enamel pins get polished to remove any unevenness between metal edges and paint. This extra step makes them smooth and reflective. Polishing is critical for achieving that glossy, high-end feel. Customers often mention how polished hard enamel pins appear more premium.

Profundice en el pulido del esmalte duro
I view polishing as a final finishing chore for top-tier enamel pins. The process involves specialized buffing wheels and compounds. If I skip or rush polishing, the metal lines might feel rough. That tarnishes the entire design.
Consejos para pulir:
- Correct Grit Compound: I start with a coarser compound, then move to a fine one.
- Equipo de seguridad: The buffing wheel can spin fast, so I wear protective gloves.
- Time Investment: Polishing each pin thoroughly is time-consuming, but it’s essential to impress discerning collectors.
Brands in Russia, France, or the UK often request hard enamel for high-profile events or product launches. The polishing step raises production costs slightly, but it also boosts perceived value. I prefer perfect finishes over cutting corners.
Electrochapado
Now it’s time for the hard enamel pins to get plated. Because the enamel is fully set, the plating only bonds to exposed metal edges.
Hard enamel pins head back to the electroplating bath. This second plating step applies the same principle of using electrical current to deposit metal molecules onto the pin’s metal edges. It keeps the enamel colors crisp, as those sections do not conduct electricity.
Profundice en la galvanoplastia para esmalte duro
Lo considero como una segunda oportunidad para agregar un brillo metálico refinado. Vigilo de cerca la temperatura del baño de revestimiento y los niveles de pH. Una falta de coincidencia podría provocar manchas o defectos de color.
Problemas comunes y soluciones:
- Recubrimiento desigual: Ajuste la abrazadera o la disposición de los cables para que cada pasador quede completamente expuesto.
- Descoloramiento: Reemplace la solución electrolítica contaminada o corrija los niveles de voltaje.
- Hora en Bath: El recubrimiento excesivo puede provocar grumos o un acabado opaco, por lo que cronometré cuidadosamente cada lote.
Tenía un pedido para un museo importante en los Estados Unidos. Pidieron contornos dorados sobre una colección de esmalte duro protagonizada por personajes históricos. Esa segunda pasada de enchapado hizo que los bordes resaltaran brillantemente. Verificar cada detalle me dio tranquilidad.
Detalles de serigrafía
A veces necesito detalles adicionales que el esmalte por sí solo no puede lograr. La serigrafía me permite agregar texto o pequeños logotipos encima del diseño.
Este paso es opcional. Si el diseño requiere detalles extremadamente finos o múltiples colores de logotipo, utilizo serigrafía. Pongo una capa de tinta sobre el esmalte horneado. Luego lo dejé curar, lo que dio como resultado líneas nítidas y un texto vibrante que el esmalte no puede replicar.
Profundice en la serigrafía sobre esmalte
Al principio evité la serigrafía debido al costo, pero algunos clientes insistieron en diseños pequeños e intrincados. El logo de Ray Ban en las gafas de sol es un ejemplo clásico. Produzco elementos complejos de marca con mayor precisión mediante tinta impresa.
Desglose del proceso:
- Prepara la pantalla: Cubro una malla fina con una emulsión sensible a la luz.
- Exponer y enjuagar: A template blocks areas where ink shouldn’t pass.
- Apply Ink: I use a squeegee to press ink through the mesh onto the pin.
- Curing: The printed layer must dry thoroughly to avoid smudges.
I love seeing how this step can elevate a design. A museum might request a small tagline on a special edition coin. Without screen printing, these words might be too small to enamel accurately.
Control de calidad
Finally, no product leaves my factory without a final inspection. I call this the “last line of defense.”
Quality assurance involves checking for scratches, color flaws, or faulty backings. I do this by hand, verifying that each pin meets my standards for color accuracy, plating smoothness, and clasp strength. Only then do I package the pins for delivery.
Profundice en el control de calidad
I rely on a consistent checklist. One of my biggest frustrations is shipping an order overseas, only to learn half the pins had minor defects. That hurts my brand reputation. So I prefer to screen them thoroughly.
Mi lista de control de calidad:
| Checkpoint | What I Look For |
|---|---|
| Color Accuracy | Compare enamel color to Pantone swatch |
| Metal Finish | Confirm plating has no patches |
| Attachment Strength | Ensure soldered clasp doesn’t wiggle |
| Surface Imperfections | Look for scratches or bubbles |
Since I do B2B wholesale only, large corporate buyers expect uniform quality across bulk orders. I notice my sporting goods clients appreciate consistent color. Travel companies often focus on strong clasps that won’t pop off easily. Delivering reliable pins keeps me competitive on Alibaba, exhibitions, and my own website.
Preparación de embalaje y envío
After passing final QA, I prepare them for packaging, labeling, and shipping. Proper packaging protects pins from damage in transit.
I often pack bulk orders in sturdy boxes with foam padding or individual poly bags. This step helps me reduce the risk of scratches during shipping. I label everything clearly to streamline customs checks and ensure timely delivery.
Etiquetado y Documentación
I print labels with product details, quantity, and shipping addresses. My export documents must satisfy import regulations for the United States, Russia, France, and beyond. Mark Chen once shared how delayed paperwork cost him a sales season. I prioritize accuracy to prevent that.
Opciones de carga
- Air Freight: Quicker but costs more.
- Sea Freight: Economical but takes longer.
- Express Services: Great for urgent samples or small-batch orders.
A French museum client once ordered special edition challenge coins. They paid extra for air freight to meet their exhibit launch. I juggled the final QA, packaging, and express shipping to meet their deadline.
Consejos de comunicación
I share shipping updates in real time. Miscommunication can lead to lost parcels. Some buyers come from countries with strict customs. I have experience handling these procedures. Regular email updates keep everyone informed.
Conclusión
I transform simple digital designs into beautiful enamel pins through precise molding, stamping, plating, enameling, and final QA. My focus is consistent quality, and I stay mindful of each step so every pin meets high standards.