
I once worried about confusing manufacturing steps, wasted time, and unpredictable costs. I decided to simplify the process. Now I focus on helping you avoid pitfalls. I want you to feel confident about how enamel pins are crafted.
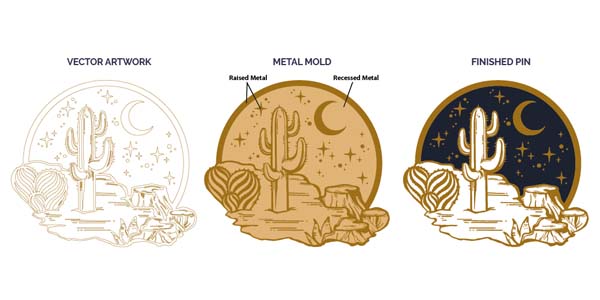
Enamel pins are created by turning a digital design into a metal mold, stamping the design into a base, adding plating, and finally filling it with enamel color. Each step ensures smooth surfaces, bright colors, and accurate details for collectors and businesses.
I remember a large buyer from France who almost gave up because of production delays. I shared the step-by-step approach. He stayed intrigued and discovered how these pins get their vibrant details.
Изготовление пресс-форм
Я начинаю с преобразования цифрового файла в физическую форму. Это превращает мои дизайнерские идеи в реальность. Эта форма становится основой для остальных этапов производства.
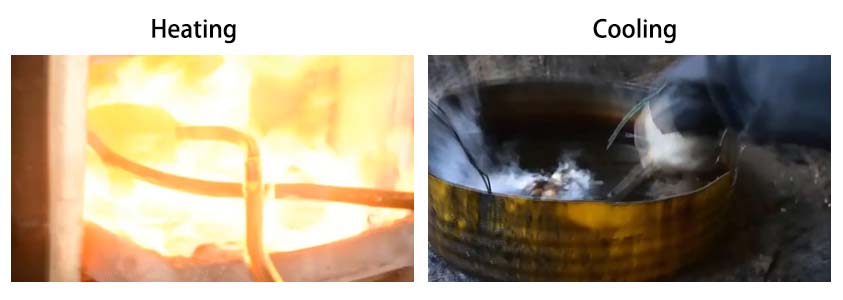
Я загружаю свой окончательный вариант в специализированный станок, который вырезает его из стали. Затем я удаляю лишний металл, чтобы придать форму форме. Многократный нагрев и охлаждение делают форму более твердой, поэтому она может выдерживать штамповку под высоким давлением. Этот шаг создает точную и прочную основу.
Dive Deeper into Mold Creation
I learned the importance of strong molds after a previous batch shattered under stress. That mishap forced me to test new steel alloys. Now I rely on high-grade industrial steel. Heat treating it ensures the mold won’t crack when used on softer metals like iron or zinc alloy. Below is a brief overview:
| Шаг | Действие | Почему это важно |
|---|---|---|
| Digital File | Finalize pin artwork in vector form | Ensures crisp outlines |
| CNC Cutting | Machine carves out design in steel | Achieves exact details |
| Heat Treat | Repeated heating and cooling cycles | Increases mold strength |
| Excess Trim | Cut off surplus metal material | Helps mold fit machinery |
I value precision because a flawed mold can ruin hundreds of pins. Maintaining strict quality checks helps me avoid wasted materials and time.
Stamp the Pattern and Cut out the Pins
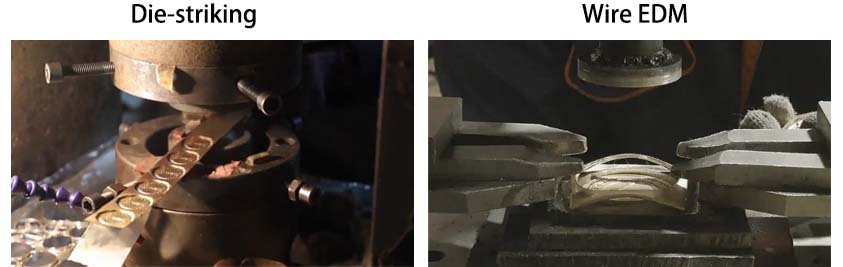
After the mold is ready, I stamp the pin shape into softer metal. This is where the design takes a physical form.
I place the hardened steel mold into a stamping machine. Then I press it with about five tons of force onto an iron or zinc alloy plate. Next, a separate machine punches out the final shape of the pin. This is also when I solder on the pin backing.
Dive Deeper into Stamping
I remember my first stamping session with Mark Chen, a confident French buyer who wanted to see how we transform designs into 3D shapes. He was fascinated by the thunderous press noise. This step requires consistent pressure. If the machine is off by even a fraction, the design gets misaligned.
Key Considerations:
- Metal Choice: Iron or zinc alloy is common. They are affordable and soft enough for high-detail stamps.
- Machine Calibration: I test pressure levels before each run. Precise calibration prevents double impressions and preserves the mold.
- Soldering the Backing: I attach the clasp while the pin is still warm. This approach ensures a solid joint, reducing risk of breakage.
I sometimes face time constraints if I have large orders from the United States or Europe. Keeping four production lines running helps me stay on schedule, but I still prioritize correct machine setup over speed. I want to avoid final pins with mismatched outlines.
Electroplated
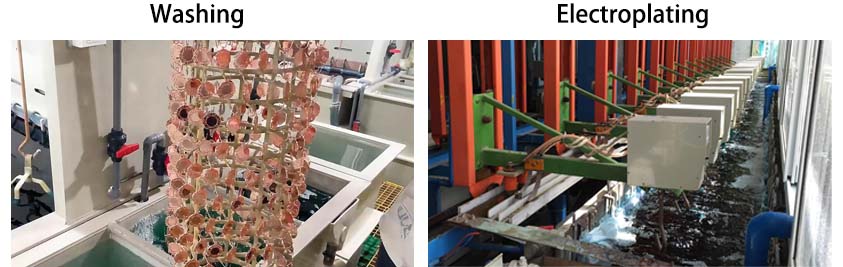
Next, I prepare soft enamel pins for electroplating. This step gives the pins their metallic finish or dyed color. It’s also where the pins begin to look polished.
Soft enamel pins get electroplated first. An electric current passes through a special solution, bonding the chosen metallic finish (like gold or silver) onto the pin. Soft enamel pins can also be color-dyed in any Pantone shade if you prefer non-metallic outlines.
Dive Deeper into Electroplating for Soft Enamel
I was initially baffled by the electroplating science. Now I see it like a magic bath. The positive ions from the plating metal deposit onto the negative pin base. This plating ensures consistent color and adds a protective layer.
Common Finishes:
- Золото: Popular for luxury appeal.
- Серебро: Classic, reflective look.
- Античная латунь: Эффект ретро, подходит для винтажных тем.
- Цветной краситель: Если мне нужны розовые контуры или другие необычные цвета, я полагаюсь на краситель, а не на металлическое покрытие.
Я замечаю, что компании, производящие спортивные товары, часто предпочитают в качестве наград традиционное золото или серебро. Между тем, туристические компании или музеи могут попросить больше экспериментальных цветов. Гальваника – ключевой этап. Если я не буду поддерживать чистый раствор или стабильный ток, конечная поверхность может выглядеть тусклой или неровной.
Enamel and Bake
В этот момент булавки приобретают яркий цвет. Будь то мягкая эмаль или твердая эмаль, процесс включает в себя тщательное нанесение эмалевой краски и ее запекание.
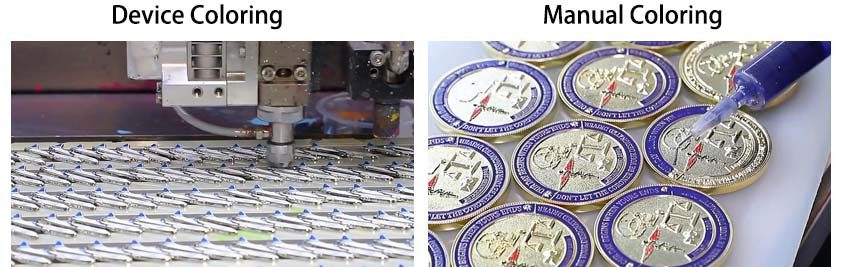
При мягкой эмали я заполняю углубления тонкой краской, оставляя края булавки приподнятыми. Для твердой эмали я заполняю краской до краев, а затем запекаю. Я либо использую машинный инжектор, либо делаю это вручную. После этого краска затвердевает в печи.
Dive Deeper into Enamel Application
Я считаю, что эмалирование — это наиболее визуально приятный этап. Я видел, как изящные узоры супа рамэн или замысловатые трехглазые лисы оживали, когда добавлялся цвет. Я использую либо автоматизированные инструменты, либо ручные методы:
Enamel Application Methods (Soft vs. Hard)
| Тип | Стиль приложения | Окончательный вид | Типичные случаи использования |
|---|---|---|---|
| Мягкая Эмаль | Тонкий слой, утопленный под край | Текстурированные, видимые металлические границы | Сложная линия искусства, экономичная |
| Твердая Эмаль | Заполнено до уровня металлических кромок | Плоский, глянцевый, более прочный | Премиальные штифты, полированная окончательная отделка |
На данный момент я заметил, что такие клиенты, как Марк Чен, часто выбирают мягкую эмаль для туристических памятных монет, потому что она дешевле и имеет больше вариантов цветового контура. Корпоративные покупатели, которым нужен тяжелый вид, иногда выбирают твердую эмаль. Очень важно отслеживать потребности клиентов. Если я неправильно залью эмаль, итоговое изделие будет выглядеть неаккуратно, и я рискую переделать.
Polish
После того, как мягкие эмалированные булавки запекаются, они почти готовы. Однако булавки из твердой эмали требуют дополнительной полировки, чтобы обеспечить идеально ровную поверхность.
Hard enamel pins get polished to remove any unevenness between metal edges and paint. This extra step makes them smooth and reflective. Polishing is critical for achieving that glossy, high-end feel. Customers often mention how polished hard enamel pins appear more premium.

Dive Deeper into Polishing Hard Enamel
I view polishing as a final finishing chore for top-tier enamel pins. The process involves specialized buffing wheels and compounds. If I skip or rush polishing, the metal lines might feel rough. That tarnishes the entire design.
Polishing Tips:
- Correct Grit Compound: I start with a coarser compound, then move to a fine one.
- Защитное снаряжение: The buffing wheel can spin fast, so I wear protective gloves.
- Time Investment: Polishing each pin thoroughly is time-consuming, but it’s essential to impress discerning collectors.
Brands in Russia, France, or the UK often request hard enamel for high-profile events or product launches. The polishing step raises production costs slightly, but it also boosts perceived value. I prefer perfect finishes over cutting corners.
Electroplated
Now it’s time for the hard enamel pins to get plated. Because the enamel is fully set, the plating only bonds to exposed metal edges.
Hard enamel pins head back to the electroplating bath. This second plating step applies the same principle of using electrical current to deposit metal molecules onto the pin’s metal edges. It keeps the enamel colors crisp, as those sections do not conduct electricity.
Dive Deeper into Electroplating for Hard Enamel
Я думаю об этом как о втором шансе добавить изысканный металлический блеск. Я внимательно слежу за температурой гальванической ванны и уровнем pH. Несоответствие может привести к появлению пятен или дефектов цвета.
Common Issues and Solutions:
- Неравномерное покрытие: Отрегулируйте зажим или расположение проводов так, чтобы каждый штифт был полностью открыт.
- Обесцвечивание: Замените загрязненный раствор электролита или отрегулируйте уровень напряжения.
- Время в Бате: Чрезмерное покрытие может привести к образованию комочков или тусклости покрытия, поэтому я тщательно рассчитываю каждую партию.
У меня был заказ на крупный музей в США. Они запросили золотые контуры на коллекции твёрдой эмали с изображением исторических личностей. В результате второго прохода покрытия края стали блестящими. Проверка каждой детали придала мне душевное спокойствие.
Screen Printing Details
Sometimes I need extra details that enamel alone can’t achieve. Screen printing allows me to add text or tiny logos on top of the design.
This step is optional. If the design calls for extremely fine details or multiple logo colors, I use screen printing. I layer ink on top of the baked enamel. Then I let it cure, resulting in crisp lines and vibrant text that enamel can’t replicate.
Dive Deeper into Screen Print on Enamel
I originally avoided screen printing due to cost, but certain clients insisted on tiny, intricate designs. The Ray Ban logo on sunglasses is a classic example. I produce complex brand elements more accurately through printed ink.
Process Breakdown:
- Prepare the Screen: I coat a fine mesh with a light-sensitive emulsion.
- Expose and Rinse: A template blocks areas where ink shouldn’t pass.
- Apply Ink: I use a squeegee to press ink through the mesh onto the pin.
- Curing: The printed layer must dry thoroughly to avoid smudges.
I love seeing how this step can elevate a design. A museum might request a small tagline on a special edition coin. Without screen printing, these words might be too small to enamel accurately.
Контроль качества
Finally, no product leaves my factory without a final inspection. I call this the “last line of defense.”
Quality assurance involves checking for scratches, color flaws, or faulty backings. I do this by hand, verifying that each pin meets my standards for color accuracy, plating smoothness, and clasp strength. Only then do I package the pins for delivery.
Dive Deeper into Quality Assurance
I rely on a consistent checklist. One of my biggest frustrations is shipping an order overseas, only to learn half the pins had minor defects. That hurts my brand reputation. So I prefer to screen them thoroughly.
My QA Checklist:
| Checkpoint | What I Look For |
|---|---|
| Color Accuracy | Compare enamel color to Pantone swatch |
| Metal Finish | Confirm plating has no patches |
| Attachment Strength | Ensure soldered clasp doesn’t wiggle |
| Surface Imperfections | Look for scratches or bubbles |
Since I do B2B wholesale only, large corporate buyers expect uniform quality across bulk orders. I notice my sporting goods clients appreciate consistent color. Travel companies often focus on strong clasps that won’t pop off easily. Delivering reliable pins keeps me competitive on Alibaba, exhibitions, and my own website.
Packaging and Shipping Preparation
After passing final QA, I prepare them for packaging, labeling, and shipping. Proper packaging protects pins from damage in transit.
I often pack bulk orders in sturdy boxes with foam padding or individual poly bags. This step helps me reduce the risk of scratches during shipping. I label everything clearly to streamline customs checks and ensure timely delivery.
Labeling and Documentation
I print labels with product details, quantity, and shipping addresses. My export documents must satisfy import regulations for the United States, Russia, France, and beyond. Mark Chen once shared how delayed paperwork cost him a sales season. I prioritize accuracy to prevent that.
Варианты перевозки
- Air Freight: Quicker but costs more.
- Sea Freight: Economical but takes longer.
- Express Services: отлично подходит для срочных образцов или небольших партий.
Клиент французского музея однажды заказал специальные монеты-вызовы. Они доплатили за авиаперевозку, чтобы встретить запуск выставки. Я совмещал окончательный контроль качества, упаковку и экспресс-доставку, чтобы уложиться в сроки.
Советы по общению
Я делюсь новостями о доставке в режиме реального времени. Недопонимание может привести к потере посылки. Некоторые покупатели приезжают из стран со строгой таможней. Имею опыт проведения подобных процедур. Регулярные обновления по электронной почте держат всех в курсе.
Заключение
Я превращаю простые цифровые рисунки в красивые эмалированные булавки посредством точного формования, штамповки, нанесения покрытия, эмалирования и окончательного контроля качества. Я сосредоточен на постоянном качестве и внимательно отношусь к каждому шагу, чтобы каждая булавка соответствовала высоким стандартам.