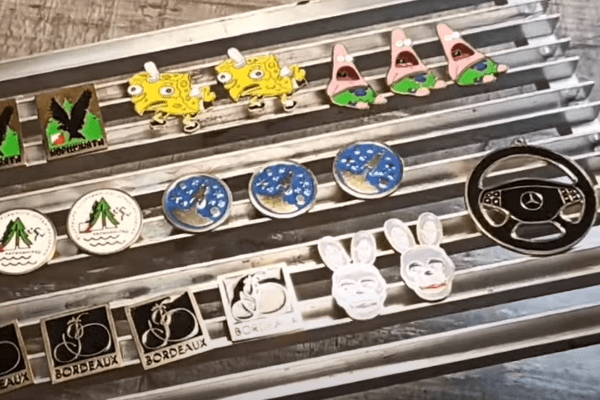
Мне всегда нравились эмалированные булавки. Люди восхищаются ими, но боятся стоимости производства. Я хорошо знаю эту проблему. Раньше меня это подавляло. Потом я нашел метод. Теперь я хочу поделиться с вами тем, как я это решил.
Изготовление эмалевых булавок в домашних условиях включает в себя простые шаги гравировки, базовые инструменты и немного практики. Вы можете подготовить латунные листы, нанести резист для своего дизайна, протравить металл, покрасить свои рисунки и обжечь их для получения прочной эмали.
Я помню, как впервые задумался сделать булавки самостоятельно. Мое любопытство подтолкнуло меня к изучению самых основных домашних методов. Я хочу, чтобы вы почувствовали ту же искру, что и я, поэтому давайте начнем это путешествие вместе.
Подготовьте свой металл
Мне нравится начинать каждый проект с выбора и резки металлических листов. Этот шаг имеет важное значение. Он закладывает основу для всего процесса изготовления булавок. Я обычно выбираю латунные листы, потому что они прочные и имеют красивую отделку.
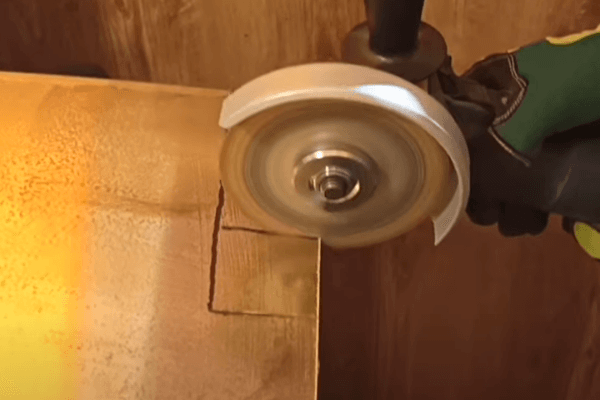
Я вырезал кусок латуни (часто толщиной 1,5 мм) ножовкой. Затем шлифую и полирую поверхность, чтобы она стала гладкой. Для этого можно использовать наждачную бумагу с зернистостью 300 или универсальную шлифовальную и полировальную машину. Я проверяю, что на поверхности нет грязи и жира, которые могут помешать адгезии. Этот первоначальный этап шлифования гарантирует, что поверхность моего штифта будет подготовлена к четким линиям травления и лучшему покрытию эмали в дальнейшем. Раньше я пытался пропустить это, но это приводило к плохим результатам.
Инструменты, затраты и личные испытания
Я хочу подробнее рассказать об этапах резки и подготовки поверхности, потому что на собственном горьком опыте усвоил важность чистоты:
Разбивка моих режущих инструментов
| Элемент | Цель | Ориентировочная стоимость |
|---|---|---|
| Ножовка | Базовая резка латунных листов | $9,99 |
| Универсальная шлифовальная/полировальная машина | Гладкие края, полированная поверхность. | $78,21 |
| Наждачная бумага зернистостью 300 | Тонкая шлифовка до ровной поверхности | 5 долларов США (за упаковку) |
Когда я только начинал, я пробовал обычные ножницы по тонкой латуни. Это была катастрофа. Края были неровными, и мои руки свело судорогой. Так что рекомендую ножовку или ювелирную пилу. Если мне нужна скорость, я использую болгарку. Если мне нужны точные линии, я полагаюсь на пилу. Я узнал, что если металл не подготовлен должным образом, рисунок оторвется во время травления. Чистота имеет значение, поскольку резист плохо прилипает к пыльным или жирным поверхностям.
Прежде чем продолжить, я обычно протираю изделие изопропиловым спиртом. Иногда я даже использую ацетон, если вижу остатки покрытия. Если я пропущу надлежащую очистку, я рискну получить случайные пятна, которые испортят дизайн. Вот насколько важен Шаг 1.
Примените и установите сопротивление
Я в восторге от этого шага. Здесь я размещаю свой рисунок на металле. Я использую либо трансферную бумагу (для мягкой эмали), либо винил (для твердой эмали). Вот как я определяю, какие области будут вытравлены.
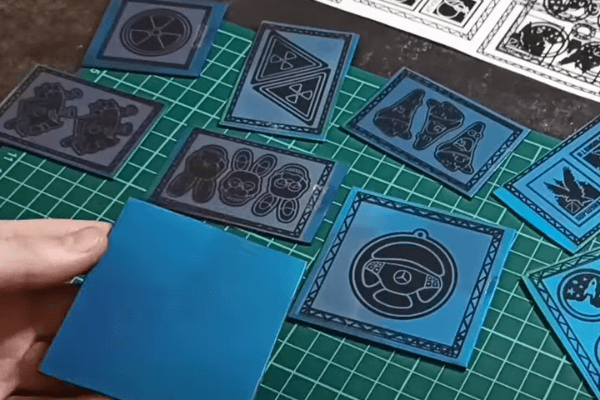
Я наношу свой дизайн, печатая его на бумаге для переноса печатных плат или виниле. Что касается трансферной бумаги, я полимеризую ее в УФ-свете, смываю тонер и гарантирую, что открытые участки металла готовы к травлению. Что касается винила, я мог бы использовать Cricut Maker 3, чтобы вырезать дизайн. Затем я прикрепляю его и нагреваю, чтобы закрепить. Мой главный вывод здесь — обеспечить четкость дизайна, чтобы линии после травления были четкими.
Методы сопротивления мягкой эмали и твердой эмали
Мягкая эмаль сопротивляется бумаге для печатных плат
Я использовал краску для печатных плат или бумагу для переноса, когда мне нужен более простой подход. Я распечатываю свой дизайн на лазерном принтере. Затем я наношу его на поверхность металла. Я поместил его под небольшую УФ-лампу на две минуты. После этого мою в мыльной воде. Это поможет удалить тонер с участков, не покрытых резистом.
| Шаги по созданию резиста мягкой эмали | Примечания |
|---|---|
| Печать на трансферной бумаге | Лазерные принтеры работают лучше всего |
| Экспонировать под УФ-светом | Около 2 минут |
| Мыльная ванна | 1 столовая ложка мыла на стакан воды |
| Промывка соленой водой | 1 столовая ложка соли на стакан воды |
Во время первой попытки я слишком долго оставлял бумагу под УФ-излучением. Дизайн получился передержанным. Я научился точно рассчитывать время. Кроме того, ванна с морской водой отлично подходит для людей, которые хотят провести более простое электрохимическое травление в домашних условиях. Я подключаю медную проводку сзади, регулирую силу тока и наблюдаю, как растворяется оголенный металл.
Твердая эмаль, сопротивляющаяся винилу
Когда я стремлюсь к булавкам из твердой эмали, я использую винил. Я распечатываю дизайн с помощью Cricut Maker 3 или любого резака для винила. Я нагреваю, обычно с помощью небольшого термопресса или даже фена, чтобы винил хорошо прилипал. Затем я готовлю кислотную ванну. Этот шаг обычно занимает несколько часов, поэтому я планирую соответственно. Однажды я расплавил конструкцию, потому что использовал кислоту, слишком сильную для металла. Я узнал, что разным металлам нужны разные кислоты. После замачивания я нейтрализую его в ванне с пищевой содой.
Я также добавляю сюда гальваническое покрытие, потому что кислотная ванна оставляет более глубокую полость, поэтому покрытие может хорошо осесть. Я подключаю деталь к гальванической машине, выбираю текущий уровень и жду, пока слой скрепится. Если все сделано аккуратно, получается аккуратный и профессиональный результат.
Травление металла
Я помню, как впервые опробовал растворы для травления. Это было похоже на научный эксперимент в моем подвале. До сих пор иногда так бывает. Офорт — это то место, где рисунок начинает приобретать свою реальную форму.

Я обычно готовлю хлорид железа, если собираюсь использовать метод Press-N-Peel Blue. Если я стремлюсь к ванне с соленой водой или кислотой, я гарантирую, что резист полностью запечатан. Я подвешиваю металл вверх дном, чтобы мусор мог упасть. Проверка каждые 30 минут помогает мне вовремя остановиться, прежде чем дизайн будет съеден. Правильно выгравированные рисунки демонстрируют четкие линии и равномерную глубину. Если я тороплюсь или пропускаю шаги, результат может быть неравномерным или вообще прорваться.
Мой опыт использования различных решений для травления
Хлорид железа против соленой воды
Хлорид железа — мой выбор для латуни или меди. Это прочное решение, которое быстро прорезает металл. Однако он немного грязный и все пачкает. Я ношу перчатки и защитную одежду. Когда мне нужен менее токсичный подход, я использую соленую воду с гальваническим станком. Это делает работу, но это может быть медленнее.
| Решение для травления | Плюс | Минусы |
|---|---|---|
| Хлорид железа | Быстро и эффективно | Может оставлять пятна на поверхностях, сильный дым. |
| Морская вода + Электро | Менее токсично, более доступно | Медленнее, требует стабильного источника питания |
Я узнал, что температура и перемешивание могут ускорить травление. Иногда я осторожно покачиваю емкость, чтобы выбить пузырьки. Если я вижу, что мой дизайн начинает тускнеть в важных областях, я все промываю, даю высохнуть и при необходимости повторно наношу резист. Это утомительно, но избавляет меня от необходимости переделывать все с нуля.
Контроль времени и глубины
Когда я планирую булавки из мягкой эмали, мне нужна только умеренная глубина, чтобы можно было заполнить их краской. Обычно это занимает 30–45 минут в хлорном железе для латуни. Для более глубокой полости (например, для твердой эмали или более глубокого покрытия) я могу потратить два часа или больше. Я держу небольшой образец для тестирования. Если он затравится, я буду знать, что нужно сократить время.
Вырезание формы
На этом этапе определяется окончательный контур штифта. Мне нравится эта часть, потому что я наконец вижу, как мой дизайн обретает форму. Я использую ювелирную пилу или иногда просто ножовку, если форма простая.
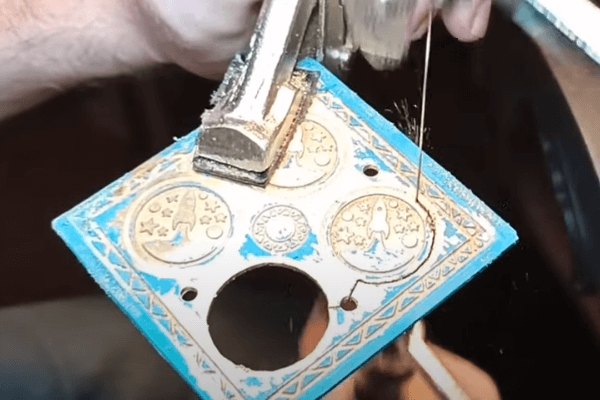
Я следую за выгравированными линиями и аккуратно удаляю лишний металл. Затем я подпиливаю и шлифую края, чтобы с ними было безопасно обращаться. Я не хочу, чтобы острые углы тыкали в людей, которые носят мои булавки. Этот завершающий этап можно выполнить в домашних условиях с помощью небольших инструментов. У меня с собой стандартный комплект.
Мои личные советы по стрижке
Однажды я попробовал создать замысловатую форму и в итоге сломал несколько пильных полотен. Теперь я обрисовываю область грубого вырезания вокруг окончательной формы. Сначала я вырезал его, оставив немного запаса. Затем я делаю детальные разрезы. Такой подход сохраняет лезвие. Кроме того, я крепко зажимаю металл, чтобы он не соскользнул во время резки.
| Режущие инструменты | Лучше всего для |
|---|---|
| Ювелирная пила | Замысловатые формы, изгибы |
| Ножовка | Прямые линии, более прочный разрез |
| Гриндер | Быстрое сглаживание краев. |
Для обработки кромок я также использовал универсальную шлифовальную и полировальную машинку. Эта полировальная машинка требует дополнительных затрат, но она экономит время. Мне пришлось оправдать его стоимость в размере около 78,21 доллара для моего бизнеса. Для меня это того стоило. Когда я серийно производю или тестирую новые формы, мне нужна эффективность.
Покраска эмали
Живопись – это то место, где дизайн становится красивым и ярким. Я использовал акриловую краску, эмалевую краску и даже УФ-краски. Они различаются по способу отверждения и по тому, насколько глянцевыми они выглядят.
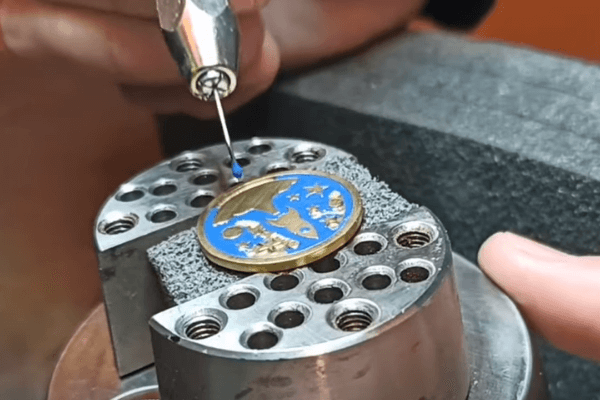
Я считаю, что маленькие игольчатые кисточки или пипетки с тонкими кончиками помогают мне наносить краску точно на протравленные участки. Я смешиваю цвета в крошечных палитрах. Я добавляю немного тоньше, если хочу более плавные мазки. Если я поспешу с этой частью, я получу пузыри или неравномерное покрытие. Наберитесь терпения и нанесите краску слоями.
Выбор краски и техники нанесения
Моя стратегия выбора краски
- Акриловая краска: Быстро сохнет, но не так долговечен, если не покрыт верхним слоем.
- Эмаль Краска: более прочный, часто используется для масштабных моделей. Сохнет дольше.
- УФ краска: Отверждается под воздействием УФ-излучения. Очень удобно для небольших помещений.
Я принимаю решение в зависимости от типа булавки, которую делаю. Если это мягкая эмаль, я хочу, чтобы краска слегка погружалась в протравленные углубления, создавая классический вид ребер. Для твердой эмали мне нужна более ровная поверхность. Я мог бы сделать несколько слоев, шлифовая между каждым слоем. Это больше труда, но выглядит профессионально.
Практические советы по рисованию
Я держу под рукой зубочистки, чтобы выковыривать пузыри. У меня всегда есть увеличительное стекло, чтобы увидеть мелкие недостатки. Если я вижу, что краска вытекает из выгравированных линий, я удаляю ее крошечной кистью, смоченной спиртом или растворителем. Такое внимание к деталям может улучшить или испортить конечный результат.
Выпечка и затвердевание
Запекание штифтов – важный шаг для долговечности эмали. Это гарантирует, что краска затвердеет и хорошо сцепится с металлом. Это также помогает предотвратить сколы отделки.
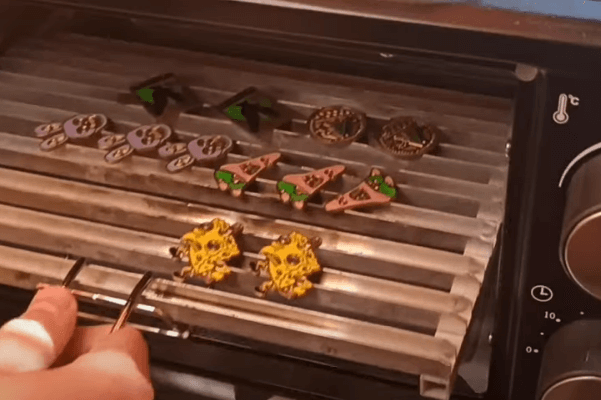
Я нагреваю духовку до 300–400 ° F и осторожно вставляю булавки. Обычно я оставляю их там примерно на два часа, но также экспериментирую со временем и температурой. После этого даю им остыть в течение 24 часов. Этот период ожидания помогает эмали полностью затвердеть.
Мои наблюдения по поводу времени выпечки
Однажды я попытался ускорить процесс, нагрев духовку до 450°F. Краска пузырилась и приобретала странные оттенки. Поэтому я рекомендую соблюдать осторожность. Разные краски могут иметь разные температурные пороги. Хорошей идеей будет сначала сделать пробный образец.
| Температура (°F) | Продолжительность выпечки | Исход |
|---|---|---|
| 300 | ~2 часа | Постепенное отверждение, меньше дефектов окраски |
| 350–400 | ~2 часа | Сбалансированное лечение, нормальный подход |
| 450 | ~1 час | Риск образования пузырей или изменения цвета |
Я узнал, что если я открою дверцу духовки слишком рано, резкое падение температуры также может привести к появлению трещин на эмали. Поэтому я выключаю огонь и даю булавкам медленно остыть. На следующий день я провожу быстрый тест на царапины на незаметном участке. Если пройдет, перехожу к полировке.
Полировка и последние штрихи
Это моя любимая часть. Мне нравится представлять окончательный вид булавки. Полировка удаляет пыль и остатки материала. Это также придает булавке блеск, который бросается в глаза.
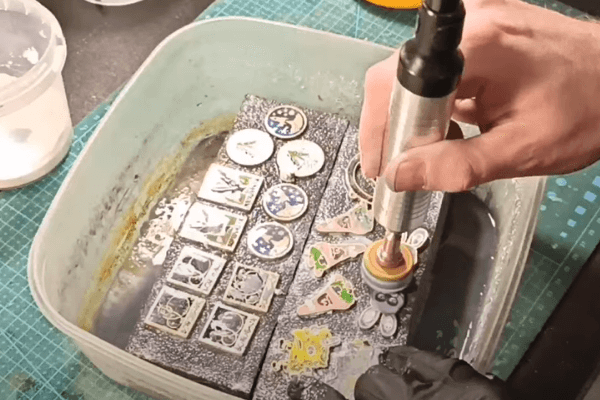
Я часто возвращаюсь к своей универсальной полировальной машине. Мягкое полировальное колесо удаляет с поверхности пятна. Я также использую салфетку из микрофибры, чтобы вытереть остатки лака. Если я вижу какие-то недостатки в краске, то исправляю их маленькой кисточкой. Затем я храню булавки в сухом месте, чтобы защитить их от влаги.
Мои шаги для блестящего результата
Полировальные пасты
- Ювелирс Руж: Отлично подходит для удаления мелких царапин.
- Крем для полировки металла: Придает отражающий блеск латунным или медным краям.
- Верхнее покрытие из УФ-смолы: Можно наносить поверх для дополнительной защиты, но это добавляет толщины.
Я узнал, что окончательная полировка может подчеркнуть недостатки. Иногда я нахожу крошечные пятнышки краски на металле. Это унизительное напоминание о том, что изделия ручной работы могут иметь небольшие причуды. Однако я также воспринимаю эти небольшие недостатки как часть очарования. Если мне нужна безупречная крупная партия для клиента, я могу положиться на свои заводские линии. Но в личном или небольшом проекте мне нравятся эти тонкие штрихи.
Дополнительный подход к массовому производству
Я управляю INIMAKER в Китае. У меня четыре производственные линии, которые обрабатывают крупные заказы для корпоративных клиентов. Я также продаю оптом многим крупным покупателям в США, России, Франции и других странах. Но когда я впервые поэкспериментировал с эмалированными булавками в домашних условиях, я понял, что массовое производство может оказаться непрактичным для домашнего использования одного человека.
В больших масштабах заводы полагаются на стальные штампы, вырезанные на мощных фрезерных станках с ЧПУ. Они штампуются на большом прессе. Они наносят эмалевые краски с помощью коммерческих дозирующих машин, а затем обжигают их в промышленных печах. Это не подход «сделай сам». Если вам нужны тысячи контактов, рассмотрите фабрику. Но если вам нужно всего несколько штук, этот маршрут, сделанный своими руками, идеален.
Мой взгляд как владельца фабрики и мастера
Понимание разницы
Когда я работаю с крупными B2B-клиентами, им нужно стабильное качество. Им нужны сертификаты, надежная логистика и гарантированные сроки выполнения заказов. Мои типичные клиенты, такие как Марк Чен из Франции, занимаются туристическим бизнесом. Им нужны живописные монеты или значки в больших объемах. Они также беспокоятся о стоимости, таможне и времени доставки.
Когда Марк закупает продукцию из развивающихся стран, он фокусируется на цене и качестве. Он ненавидит задержку поставок. Это одна из причин, по которой мы усовершенствовали наши процессы в INIMAKER. У нас стабильные производственные потоки, большие печи и квалифицированные рабочие. Однако для личного или мелкосерийного производства домашнего подхода вполне достаточно. Это позволяет мне или любому энтузиасту DIY экспериментировать с новыми идеями или индивидуальным дизайном без больших накладных расходов.
Тестирование и оценка ваших булавок, сделанных своими руками
Мне нравится оценивать свои булавки после каждой партии. Я ищу пузырьки краски, сколы эмали или незаметные линии. Если что-то не так, я либо исправляю это, либо отмечаю ошибку для дальнейшего использования.
Тестирование на долговечность помогает мне оценить, выдержат ли мои булавки повседневное ношение. Я мог бы прикрепить один к сумке или куртке и посмотреть, не поцарапается ли он в нормальных условиях. Я обнаружил, что защитное прозрачное покрытие может продлить срок службы штифта, особенно если он подвергается трению.
Устранение распространенных проблем
Мой стол быстрого ремонта
| Проблема | Причина | Решение |
|---|---|---|
| Пузырьки в краске | Перегрев или плохое смешивание краски | Уменьшите температуру выпекания, осторожно перемешайте краску. |
| Неполное травление | Слабый раствор или короткое время травления | Увеличьте время, проверьте концентрацию раствора |
| Сопротивляться шелушению | Грязная поверхность или слишком высокая температура при переносе. | Тщательно очистите, уменьшите применение тепла. |
| Выцветающие цвета | Чрезмерное воздействие тепла или дисбаланс отверждения УФ-излучением. | Время калибровки, используйте рекомендуемые характеристики |
Я считаю полезным вести небольшой дневник каждого эксперимента. Отмечаю марку краски, температуру и то, как получился штифт. Со временем я вижу закономерности. Например, некоторые цветные пигменты плохо переносят высокую температуру. Или некоторые металлы могут по-разному реагировать на определенные эмали.
Делитесь или продавайте свою работу
Иногда я делюсь своими эмалированными булавками, сделанными своими руками, в качестве небольших подарков или оставляю их для проверки новых дизайнерских идей, которые позже смогу внедрить в производство на своей фабрике. Если вы хотите продавать их в Интернете, вы можете разместить их на своем личном сайте или в социальных сетях. Люди ценят изделия ручной работы.
Я рекламирую эти небольшие тиражи на своем веб-сайте (www.inimaker.com) и направляю туда некоторых B2B-клиентов, если им нужны меньшие объемы. Однако обычно они просят большие объемы, и именно здесь на помощь приходят мои заводские линии. В любом случае, мне нравится видеть, как простой подход «сделай сам» все еще может дать булавку, которую люди с удовольствием покупают или коллекционируют.
Мои советы по маркетингу самодельных булавок
- Рассказывание историй: Я делюсь своим личным опытом с каждым дизайном. Покупателям нравится предыстория.
- Качественные фотографии: хорошее освещение позволяет рассмотреть детали булавки.
- Демонстрации на YouTube: Я вставляю видео, чтобы объяснить процесс. Как будто я мог бы связать учебник здесь: Учебное пособие по изготовлению эмалированных булавок своими рукамиПолем
Заключение
Я рассмотрел процесс создания эмалированных булавок в домашних условиях. Это легко сделать небольшими порциями. Результаты могут быть превосходными. Вы можете попробовать эти шаги, если хотите создать свои собственные булавки без фабрики. Желаю вам успехов в вашем DIY-приключении!


